Zünd Cutter

Zünd Cutters

General Info

 
    1. Unlock your machine with the ETH card
    2. Confirm the error message with “OK”
    3. Import your vector drawing(pdf, dxf) into the Zünd_template
    4. Use vector colours: Red = Cut, Black = Engrave, Blue = Pen
    5. Click the Send to Zund Button, select your vectors and press enter
    6. Follow the command instruction to send the job to the machine
    7. Press the online button the start the job

Cost: 30.- / h
Area: 800mm x 1300mm

  • Cardboard max 3mm
  • Corrugated cardboard Max 4mm
  • Foamboard Max 10mm
  • Set your vector lines to the correct colour. Red to cut through the material, black to engrave the surface of the material and blue to use the pen to draw on the material.
  • Make sure curved lines aren’t made up of too many polylines with a minimal amount of control points
  • Any curved lines shouldn’t have a radius tighter than 10mm.
  • Its best practice to space individual parts out with a minimum 3mm in-between. If you have many small parts very close to one another or touching, you run the risk of cutter tearing material and flipping the parts upwards.
  • The 3mm rule also applies to detailed parts such as window frames. If there are area of your parts are less that 3mm wide, the laser cutter is likely to be a better option for your parts.
  • Export your file to DXF, DWG, PDF or .3dm

Skip this step if drawing for your job isn’t required

  • To activate the pen tool press the following numbers on the control pad

Zund 1 (F3 Enter)

Zund 2 (2 1 1 4 Enter)

  • Use the navigation keys (2) to move the pen module over your material
  • Lower the pen module by pressing the tool down button (3)
  • Place the pen in the pen module. Loosen the thumb screw if it doesn’t go fully down
  • Push the pen about 1mm into your material and tighten the thumb screw.
  • Push the tool down button (3) again to raise the tool.
  • Press Esc to return to the main menu
  • Repeat all the steps above when changing to a different thickness of material
  • Please remove the pen when you have finished and place back in the pen holder

Tutorial

Machine Setup

Unlock the machine with your ETH card

Zund 1

Acknowledge the error message with “ESC”

Clear the buffer by pressing F7 on the number pad. This is a precaution to delete any jobs from the previous user still be in the queue. 

Zund 2

Clear the buffer by pressing 3, 3, 1 on the number pad then enter. This is a precaution to delete any jobs from the previous user that may still be in the queue.

Place the material on the machine bed. When placing your material, please note the orientation of the X- & Y-Axis and the zero position.

If you want to use the pen please refer to the Pen Setup Tab above in this tutorial and ask a raplab staff member for help.

Cover up the area behind your material to ensure the vacuum power as we can only specify the vacuum width not the vacuum depth.

Rhino Setup

Open the “Zund_Template”  (Desktop) in Rhino 7

Import your vector drawing (pdf, dxf, dgn) with the command “File” > “Import”

Check your vectors are the correct colour, Cut = Red (RGB 255,0,0), Engrave = Black (0,0,0), Pen = (RGB 0,0,255) by double clicking the coloured box (3) that corresponds to your layer.

Move your job inside the material boarder window. leaving a 5mm+ boarder around your workpiece

Click the send to Zuend button (1) in the Top left corner of the screen

Select your vectors. Confirm with enter

Follow the instruction in the command bar (2) pressing enter after inputting each setting

  • Type in the width of your material in the “Y” orientation
  • Select type of material
  • Type in the material thickness
  • Select “yes” to send the job

Press “on-line” (1) on the machine panel to start the task.

If the machine says “vacuum slide blocked”, simply press ESC then on-line again.

If you need to pause a job press online again.

PLease clear the Vacuum table once the job is complete.

Troubleshoot

  • Confirm with “esc”
  • Continue with “online”

Check that you do not have details smaller than 3mm. If details larger than 3mm still have a bad cut quality, contact a Raplab-Employee

  • Zund 1: Click “F7” to delete the buffer
  • Zund 2: Press 3, 3, 1 on the number pad then enter to clear the buffer
  • Re-send the task to the machine
  • Turn off the machine with “shift”+”stop”
  • ensure you are logged in with your ETH card
  • Turn on the machine with “F1”

This may because your material is too small and therefore hasn’t got enough surface area for the vacuum table to work properly. Cover up the area behind your material to solve this issue. Also make sure you have correctly set the vacuum width.

Select your vectors and click on the properties tab. Change display colour tab to By Layer.

Click on tools in the top menu and select “tool layout”. On the tool layout window. Scroll down and check the box next to “raplab”.

Zünd 1

Press the Vacuum button (4) followed by the number 2

Zünd 2

Press the Vacuum button (4) followed by the number 1


Zünd 1

  • Pause the job: online button (1).
  • Turn off the Vacuum: Vac Button (4) + 2 on the number Pad
  • Clear Buffer: F7

Zünd 2

  • Pause the job: online button (1).
  • Turn off the Vacuum: Vac Button (4) + 1 Button
  • Clear Buffer: Press 3, 3, 1 on the number pad then enter to clear the buffer
  • Re-send the task to the machine

Fertigungsverfahren & Verbindungsarten​

Fertigungsverfahren & Verbindungsarten

Es gibt viele verschiedene Fertigungsverfahren und Verbindungsarten, die bei der Realisation von (Modellbau-) Projekten in Betracht gezogen werden können. Untenstehend findest du eine nicht abschliessende Sammlung davon.

Eine Auswahl dieser Verfahren sind bei uns im Raplab verfügbar. Informiere dich dafür auf den jeweiligen Werkstattseiten.

3D Drucken

3D Drucken

  • für kleine Stückzahlen geeignet
  • flexibel einsetzbar
  • reduzierte Festigkeit

Beispiel

Laser Cut

Wasserstrahl-, Plasma- oder Laser-Cutting

  • schneiden von 2D Teilen
  • Schnittkante je nach Verfahren rau

Beispiel

Tiefziehen

Tiefziehen

  • einfaches Formen von Thermoplasten
  • für grosse und kleine Stückzahlen geeignet
  • Kostengünstig

Beispiel

CNC Fräsen_2

Fräsen & Drehen

  • Aus Rohlingen können Kubische und Rotationsteile hergestellt werden.
  • Konventionelle (nicht Computergesteuerte) Maschinen ermöglichen einfache, geometrische Bearbeitungsschritte
  • mit CNC Fräs- und Drehmaschinen sind geometrisch komplexere Teile möglich

Beispiel

Sägen

Sägen & Schleifen

  • kostengünstig
  • Thermoplaste lassen sich nur bedingt Schleifen (Wärmeentwicklung die bei der Reibung entsteht schmelzt Material)

Beispiel

Giessen

Giessen

  • Kunststoffe und Metalle
  • komplexe Formen möglich
  • geringere Genauigkeit

Beispiel

Spritzguss_4

Spritzguss

  • Form ist teuer – lohnt sich erst bei grossen Stückzahlen
  • bei Massenproduktion schnell und kostengünstig

Beispiel

Stanzen

Stanzen

  • kostengünstig in Massenproduktion
  • lohnt sich erst bei grossen Stückzahlen

Beispiel

Biegen

Biegen

  • Material wird geschwächt

Beispiel

Formschlüssig

Formschlüssig

  • Stecken
  • Schrauben, Nieten (bezüglich Schärbelastung)
  • Nähen
 
Nieten

Kraftschlüssig

  • Schrauben, Nieten (bezüglich Flächenpressung)
  • Klemmen
  • Verknoten
Schweissen

Stoffschlüssig

  • Schweissen
  • Löten
  • Kleben

Prusa 3D Printer

Prusa 3D Printer (MK3S+)

General Information

  1. Slice your STL model on PrusaSlicer and upload to an SD card. Be sure to use Original Prusa i3 MK3S+ 0.4mm nozzle and Extrudr PLA NX2 settings.
  2. Unlock the printer with your ETH card.
  3. Put the SD card into the slot of the machine.
  4. Navigate through the on screen menu and select print from SD.

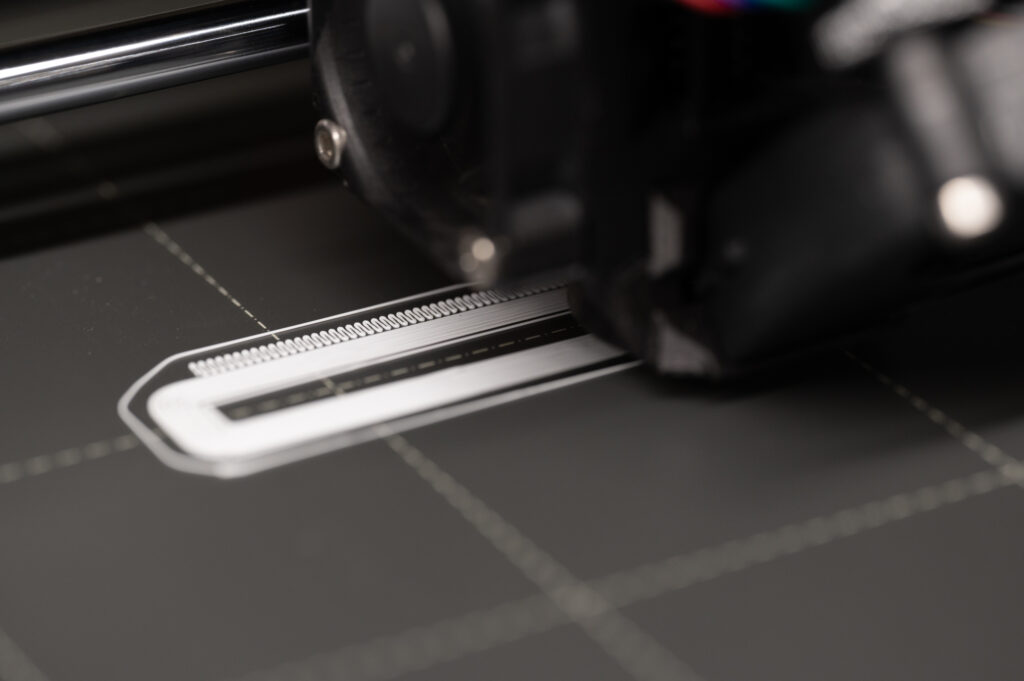
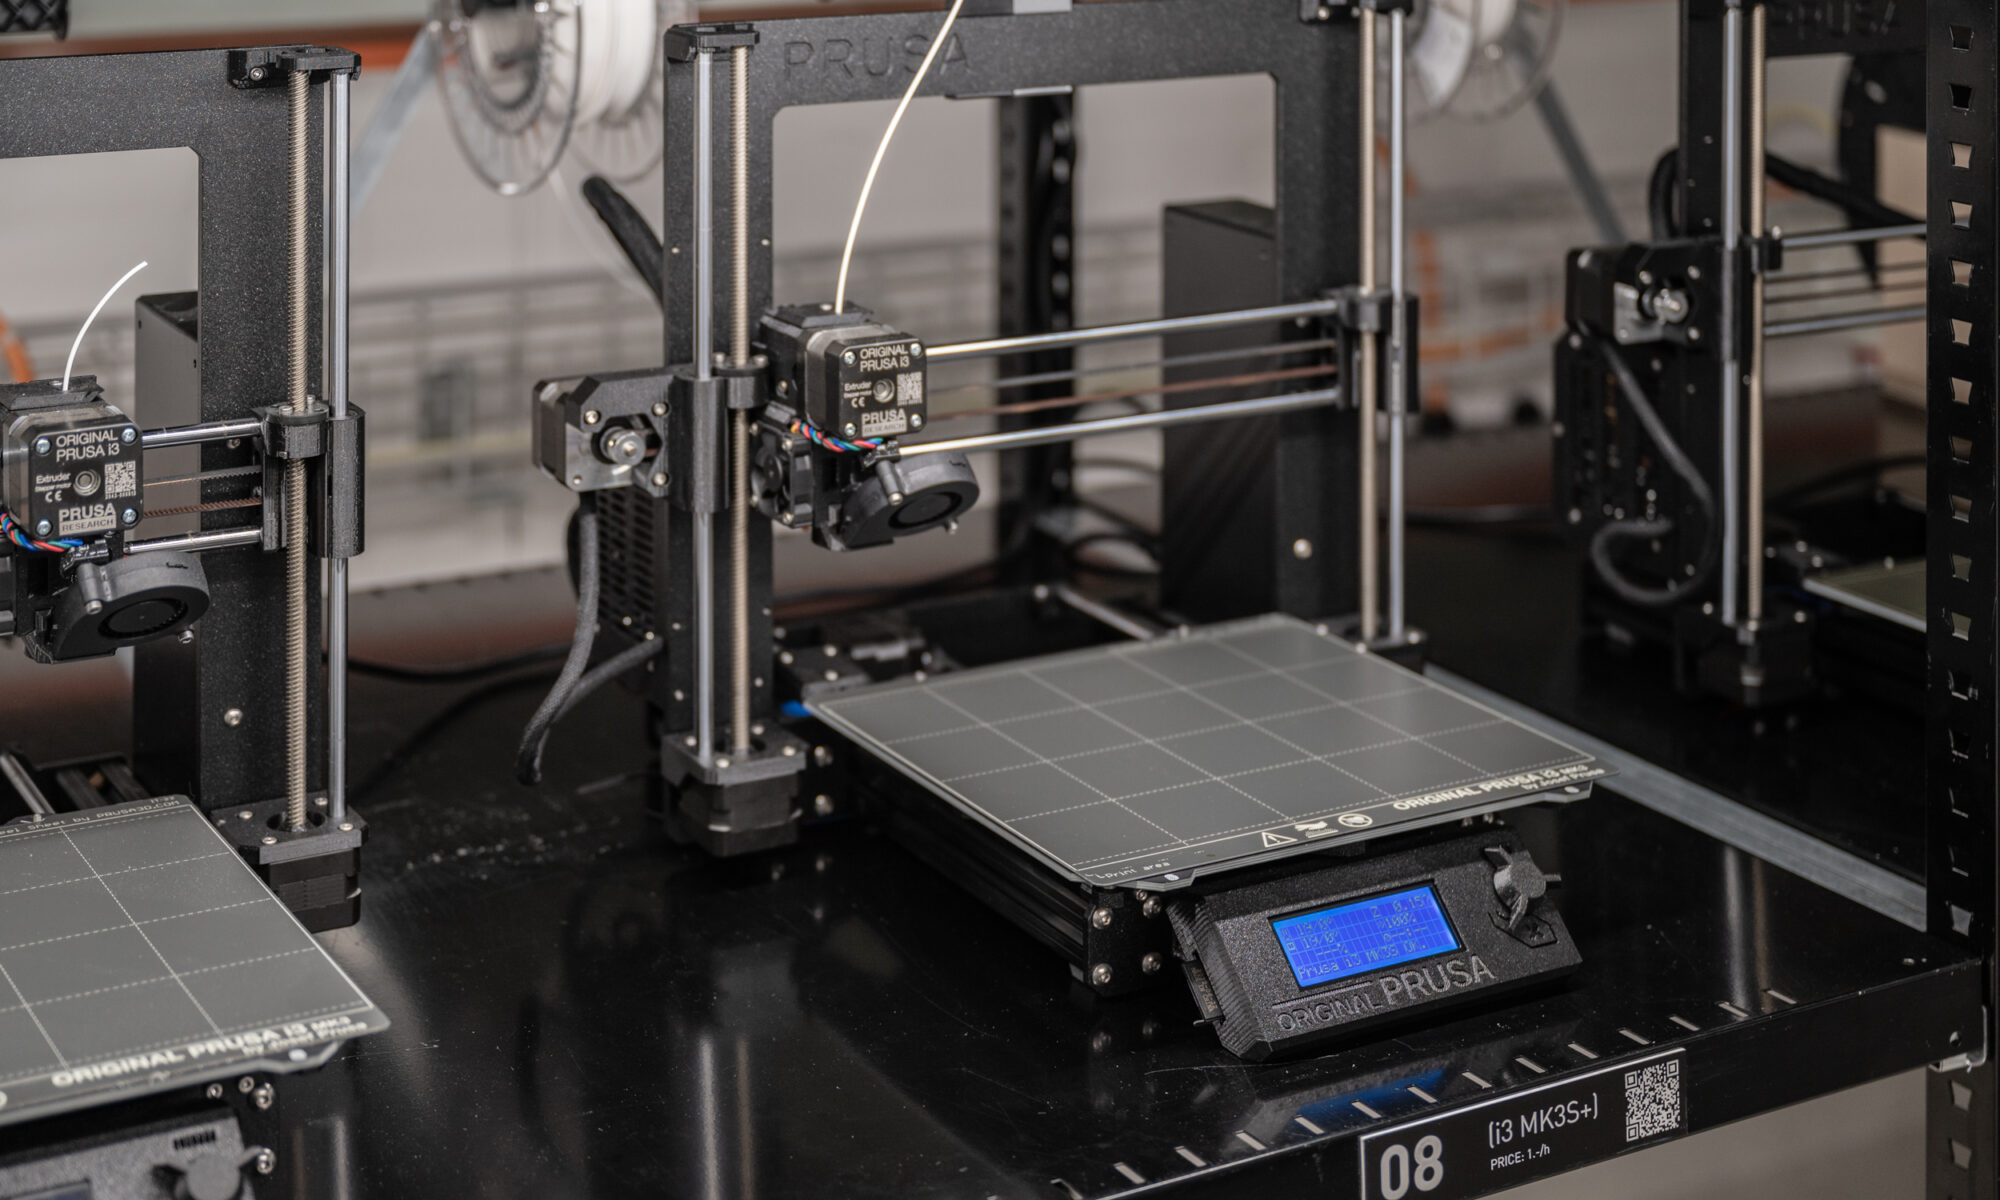
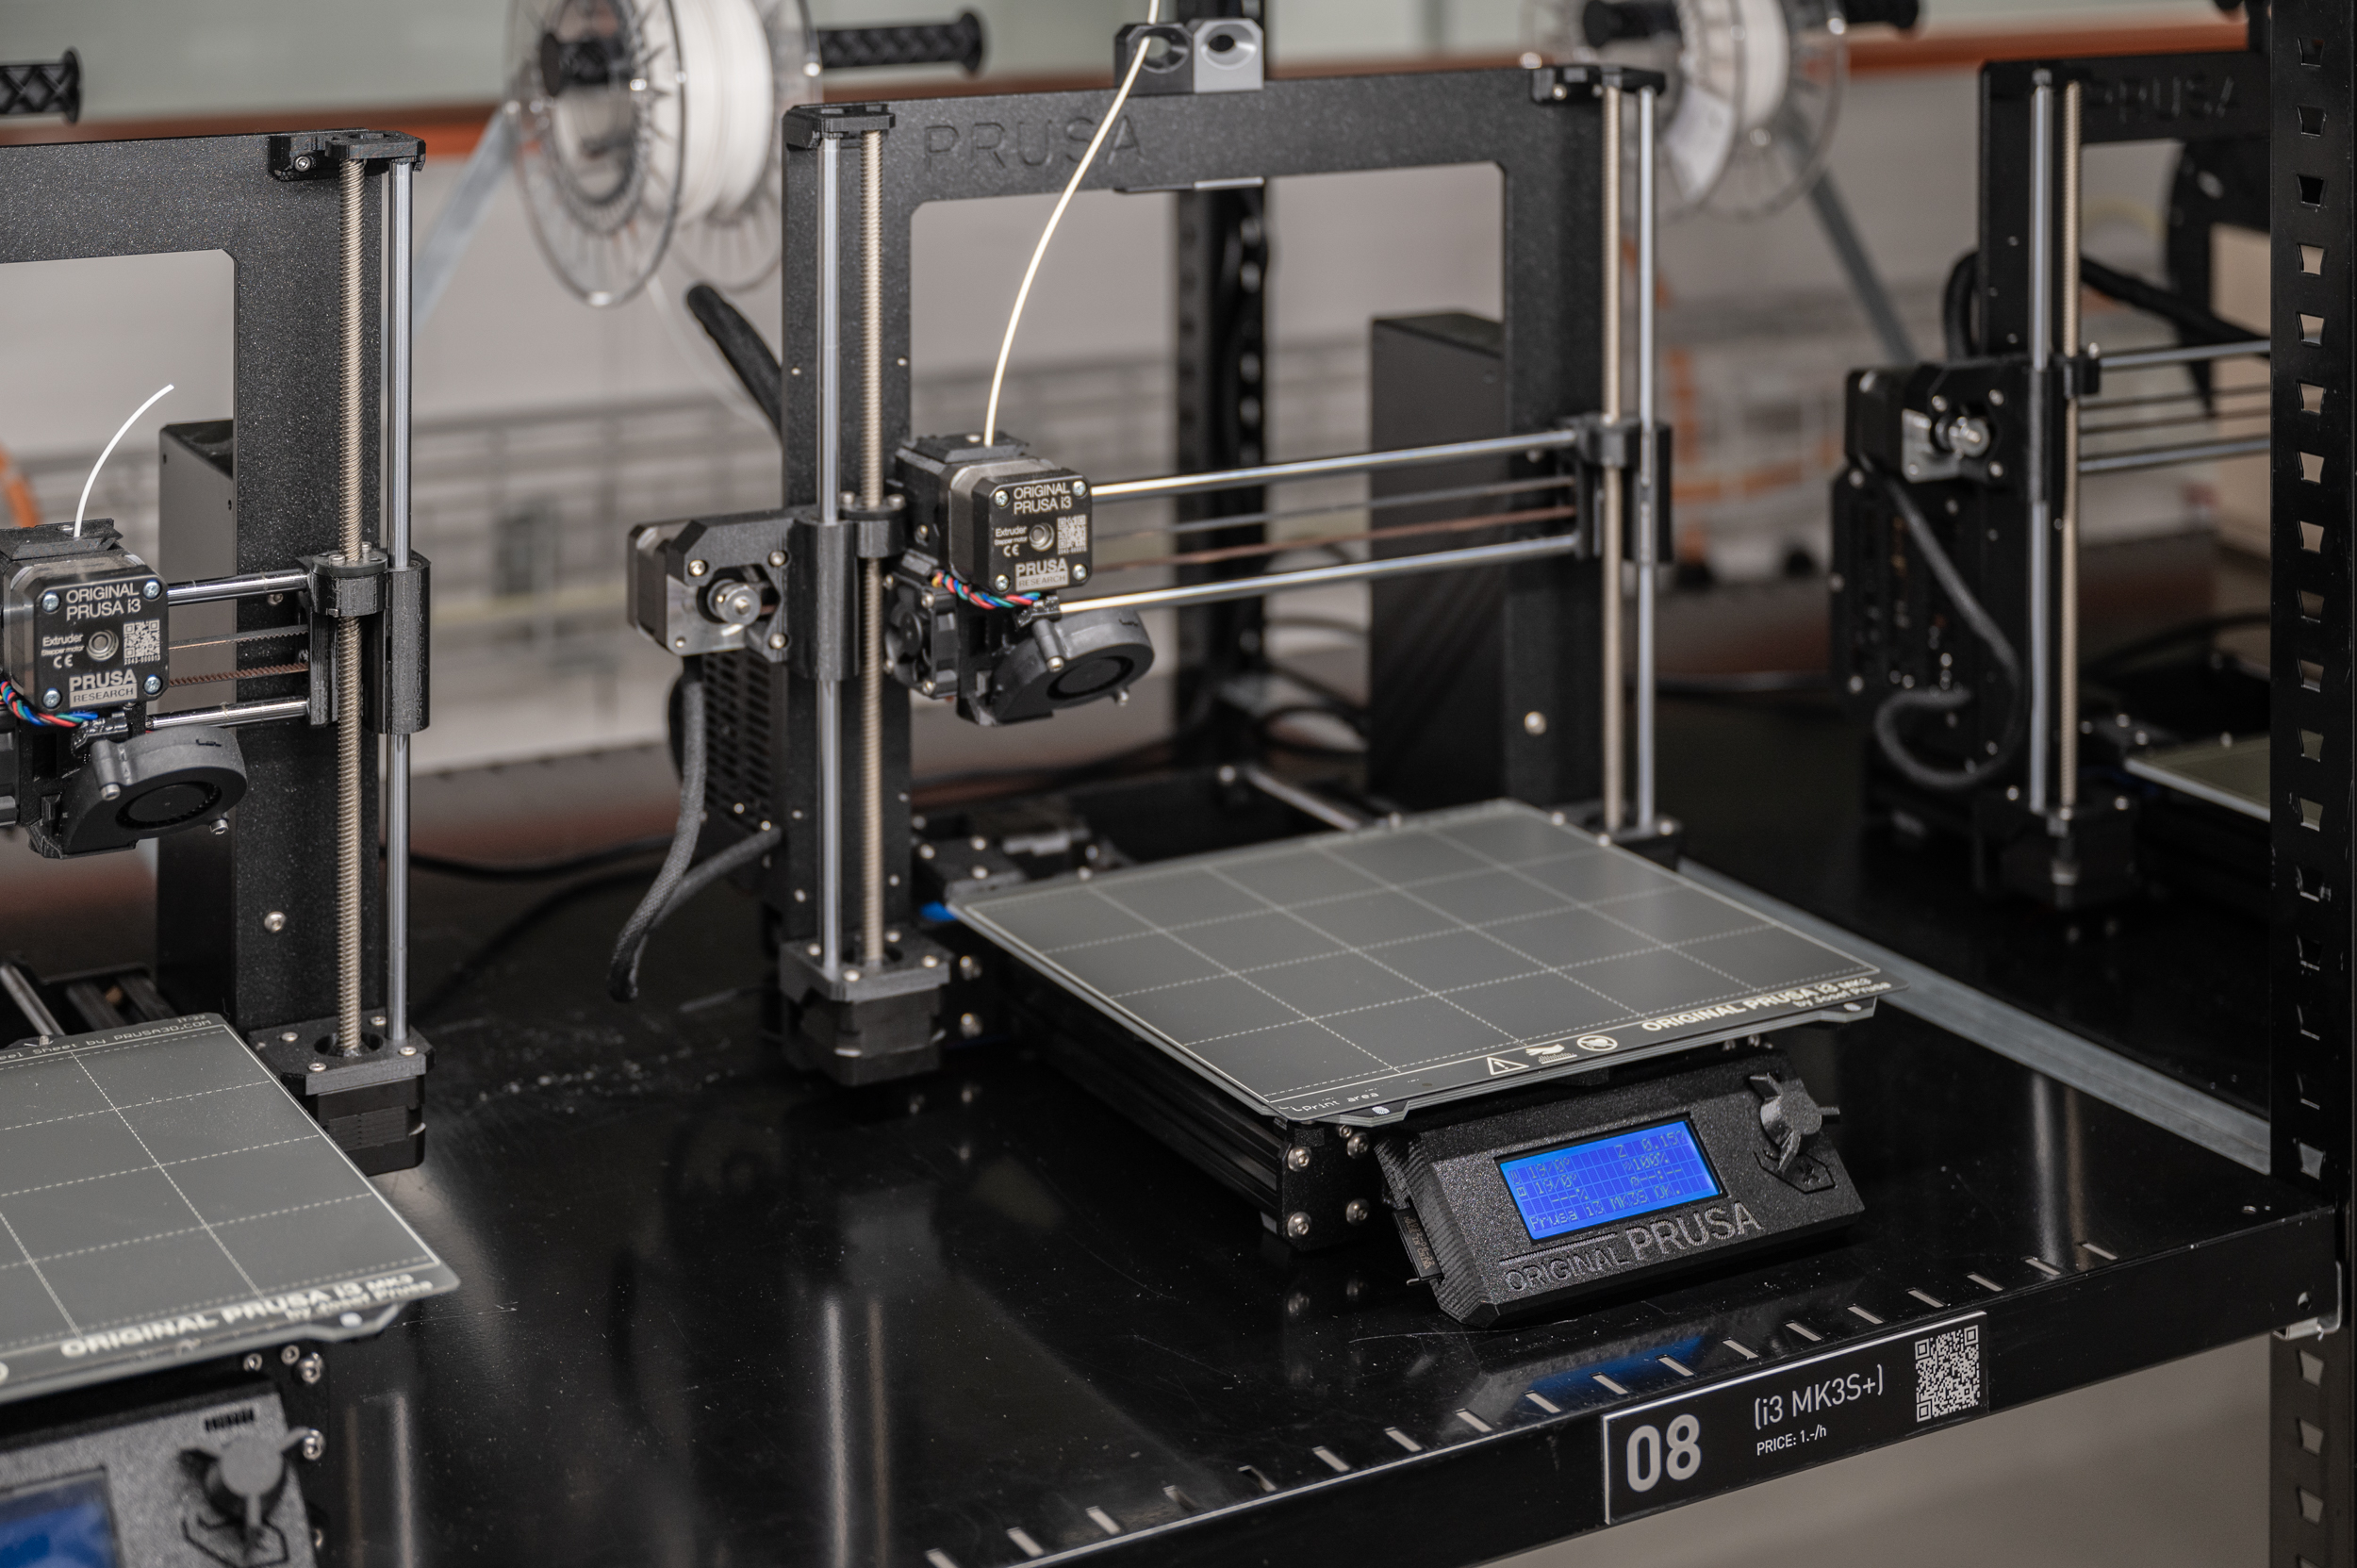
Check if the first layer sticks to the surface – if not abort the print and report it to a Raplab employee.
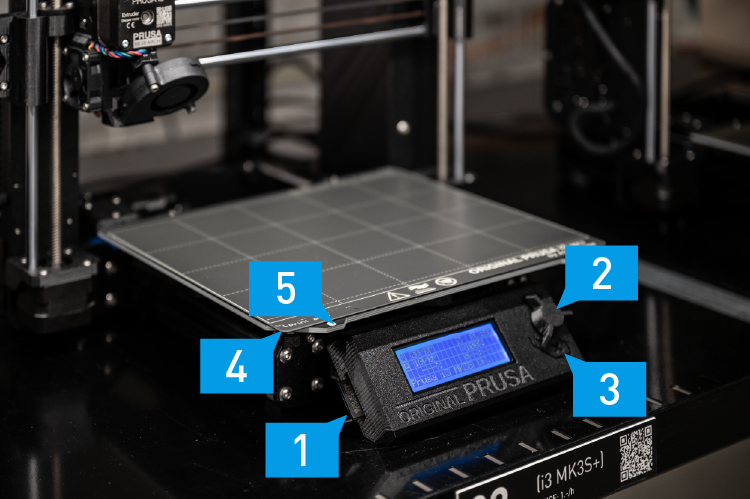
Cost: 1.- / h
Area: 250mm x 210mm
Height: 210mm

White PLA filament, 1.75mm, provided by the Raplab.

You can download PrusaSlicer to your personal computer for free here.

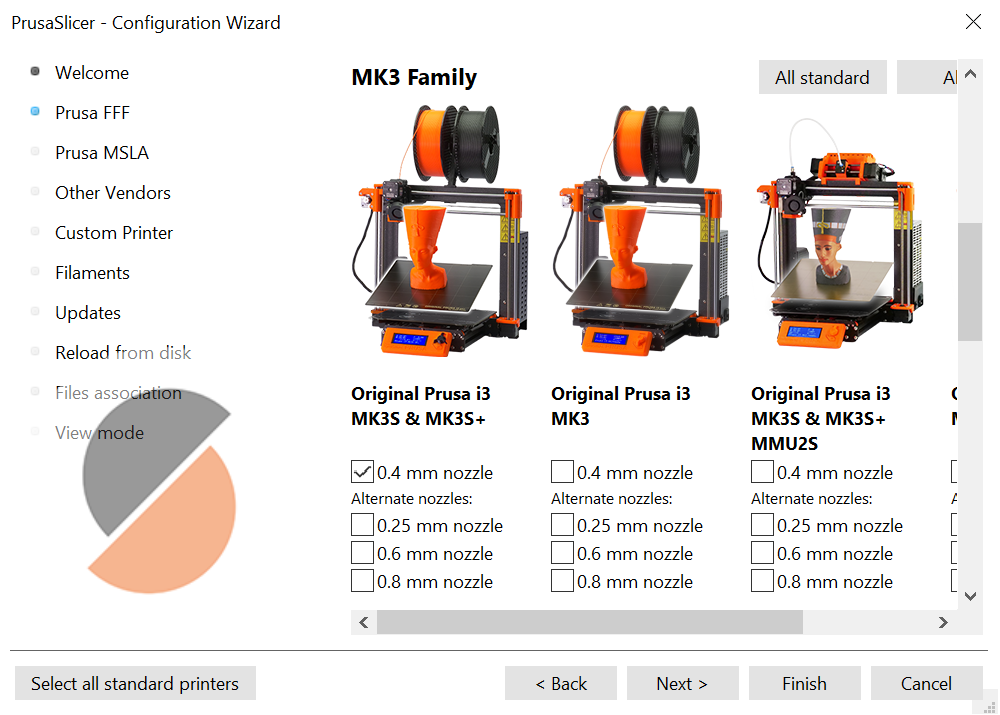
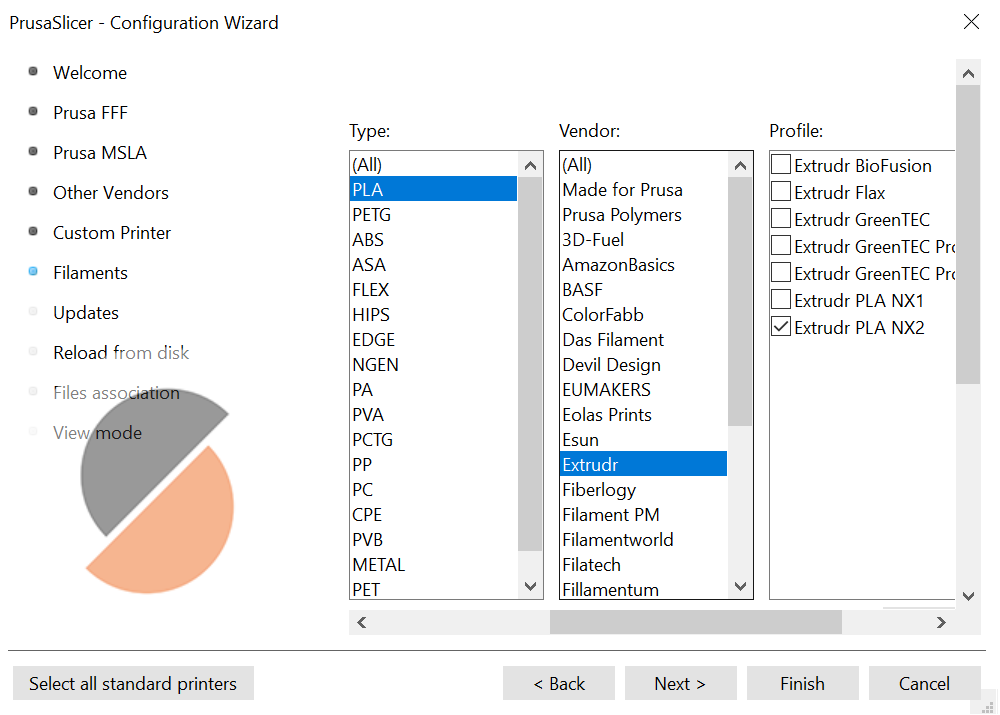
Once installed open the configuration wizard and select “0.4mm nozzle Original Prusa i3 & MK3S+” on the Prusa FFF tab and “Extrudr PLA NX2” on the filament tab. This will Install the necessary printer settings.

PrusaSlicer Tutorial

Open PrusaSlicer on your personal computer. (Install here)

Begin by clicking on “simple” (1). This will hide the features of the software which are unnecessary for a first time users.

Select “Original Prusa i3 MK3S & MK3S+” on the printer tab (2) and “Extrudr PLA NX2” on the filament tab (3). If these options are not available, please refer to the “Installing PrusaSlicer” tab located above in this machine tutorial. Do not skip this step. The print will fail if the correct Printer and filament is installed.

Select the Layer height  “0.2mm QUALITY” on the Print settings tab(4). Setting the layer height to 0.2 will give you the best results. As a rule of thumb, the layer height should be around half the nozzle diameter.

Upload your STL file to the plate by clicking the “add” button (5).

We can now move, (7) scale, (8) and rotate (9) the model to the desired position and size.

Before slicing the model, try to understand the best orientation of the object to minimize the amount of support material required.  It is also important to have a flat surface that is large enough to adhere to the print bed. We can very easily flip the object simply by selecting it, clicking the “Place on face” button (10) and clicking the surface that should be stuck to the build plate.

If we do not have any flat surfaces on our object, it may be a good idea to split our object in 2 with the “cut” button (11).

Once your happy with the position of your object, click “Slice now”(6), which will bring you onto the preview page.

You can toggle between the preview and 3d editor page (12) with the buttons located in the bottom left corner.

  • Ideally when printing we don’t want to use supports. However sometimes this is unavoidable because of overhanging parts on all face orientations. To add supports click the “supports” (1) dropdown menu and select “everywhere”. PrusaSlicer will automatically add the supports to wherever is deemed necessary.
  • If our print doesn’t have a particularly large surface area touching the build plate, it might be a good idea to add a brim. (3) This will increase the surface area, which can easily be trimmed off after printing.
  •  To check the density of the infill, pull down the slider (7). This will reveal the inside of our model. To change the density, click the Infill dropdown menu (2).
  •  To preview any changes made, press “slice now” (6), once again. This will change the button to Export G-code. 
  •  If we feel that the estimated time (5) is too long, we can make further changes to the infill (2) or change the print settings to “0.2mm SPEED” instead of “Quality” (4).
  • Once we are happy with our setting we can click the export G-code (6) and save it onto an SD card.
  • Unlock one of the printers by logging in to the Raplab touch screen pannel.
  • First check the removable heat plate on both sides (4) for any left over bits of print material from the previous user. Small bits can be easily picked away with your fingers and larger pieces can be snapped off by slightly bending the plate. Do not use any metal tools to remove the parts. This will permanently damage the build plate. 
  • Before putting the build plate back check the heated bed (5) for any small pieces of plastic or debris. The build plate has to sit perfectly flat.
  • Put your SD card into the SD card slot (1).
  • Once you put the build plate back. Click the jog-wheel button (2) to get to the main menu.
  • Turn the wheel (2) to navigate and select “print from SD”
  • On the following menu select your file by pressing the wheel (2) a final time
  • Wait for the heat bed and the extruder to reach the correct temperature.
  • Once the print begins, keep an eye on it to ensure the first layer is sticking and that the nozzle isn’t pressing into the bed. Wait until the first layer is complete before leaving the printer unattended.
  • If the machine is running into any problems you can hit the emergency stop button. (3)

Check the progress of the print from time to time. Once the print is complete, you can log out of the raplab login screen. You can then remove the build plate and bend it slightly. The print should pop right off. Pick of any remaining bits of print material with your fingers. Do not use any metal tools, this will permanently damage the build plate. Double check both sides of the build plate and the heated print bed for debris before putting back in place, ready for the next user.

Troubleshoot

Check if the power and usb cable is connected to the printer properly.

Report the malfunction to a staff-member and switch to an other printer.

The print surface needs to be cleaned and a calibration needs to be made. Please contact the Raplab Staff.

Tool Kit

Model Builders Tool Kit

Every model builder has their own set of favorite tools that they collected over many years of making. Owning your own set of tools is essential. It gives you access to a specific workflow that you can trust and produces the results you want. 

One good piece of advice is to buy tools when you need them and not in advance and to look around to see what tools others use!

The ‘essentials’ list should provide an overview of things you need to start model building. Once you progress on your journey, you might want to consider items on the list ‘for the ambitious maker.’ Owning tools and caring for and maintaining them will extend your capabilities and deepen your understanding of how the tangible world is put together substantially by raising awareness of the interconnection between idea and realization. 

Henry Welch

Henry Welch

Werkstattverantwortlicher Digitalwerkstatt

My knowledge and skills in fabrication were acquired through a BA in modelmaking at the Arts University Bournemouth, and further honed through 4 years as a modelmaker at Foster + Partners. Much of my time there was spent building presentation models for competitions and client design reviews, using a broad range of materials.  After that, I broadened my skillset further working as a carpenter and CNC machinist for various smaller companies in London.

I joined the team in 2022 and I am delighted to learn and share the many different ways of working, here in the raplab.

hiclipart.com

+41 44 633 49 93

Alessandro Tellini

Alessandro Tellini

Bereichsleiter Raplab

Alessandro Tellini (29.03.1984) is the Director of the Rapid Architectural Prototyping Laboratory (RAPLAB) and holds the Lecturer for Model and Design position at the Department of Architecture at ETH Zurich. With a graphic and product design background, Alessandro developed a strong interest in fabrication and construction early in his career. This practical knowledge has been applied to various projects, including architectural model-making, product development, and the fabrication of large-scale architectural prototypes.

In addition to his professional work, Alessandro has shared his expertise as a lecturer in national and international workshops, emphasizing the value of teaching through hands-on experiences. As the Director of Raplab, he oversees the workshop’s operations and, together with his team, instructs a significant number of students each semester, focusing on craft and design education.

Alessandro Tellini’s career reflects his commitment to architectural education and skill development at ETH Zurich, contributing to the growth of practical knowledge and creativity among students.

hiclipart.com

+41 44 633 49 93 (appointments upon request)

Wahlfach FS20

Wahlfach FS20

Wahlfach FS20

Modelmaking

Wahlfach FS20

Wegen Corona fand der Unterricht ab Ende März unerwartet online statt, so dass die

Studierenden Research-Projekte bearbeitet haben, anbei einige Beispiele.

Teilnehmende

Teaching-Team:

Katrin Derleth, Alessandro Tellini

Studierende:

Andermatt Lea, Buchmann-Ebbert Jasper, Caversaccio Tanguy, Clausen Geraldine, Debons Claire, Eschbach Damaris, Fudoli Alessandra, Geser Elena, Kallert Leon, Ki Ming Fung, Kilian Hannah, Peteler Tobias, Song Yuning


Wahlfach HS19

wahlfach HS19

Wahlfach HS19

Modelmaking

wahlfach HS19

Impressionen

Teilnehmende

Teaching Team:

Katrin Derleth, Alessandro Tellini

Studierende:

Akaki Takuma, Baghan Sogol, Barbosa Rosas Julia, Burkhalter Matthias, Chen Rongsheng, Clemens Alica, Comas Sala Albert, Graf Leo, Heikkalä Jaakko, Jacot Maxime, Keller Guy, Kruidenier Wessel, Lubes Jan, Monte Agrippino, Pons Forteza Maria

Wahlfach FS19

Cityscape FS19

Wahlfach FS19

City Scape

Cityscape FS19

Teilnehmende

Teaching Team:
 
Katrin Derleth, Alessandro Tellini

Studierende:

Al-Jamali Nadia, Bazotti Diego, Bruderer Arno,
Delory Aurore, Gloggner Cindy, Janzi Romina,
Rutishauser Jonathan, Tao Jingyu, Wang Nan,
Winkelmann Thomas, Wyss Oliver, Zhou Yuan

ConcreteSpace FS19

Seminarwoche FS19

ConcreteSpace

Impressionen

Teilnehmende

Teaching Team:
 
Katrin Derleth, Alessandro Tellini

Studierende:

Giulia Boller, Emmanuelle Farine, Maximilian Glaus, Victor Jörgensen, Noemi Kallen, Jonas Kissling, Dominic Knecht, Emil Schaad, Severin Spörri, Haruhi Untersander